Sortable Bar Chart using d3-tip to add tooltips
It really started with a user asking me whether OBIEE has
donut chart. I said “no”, not with the out of the box OBIEE. I know that OBIEE
has great ability to integrate external applications through the use of java
script libraries but I never had time to explore that. Once I started to dig deeper,
I got fascinated by the possibility. Stunning
visualization examples of D3 (Data-Driven Documents) blew my mind.
If you never been
to D3 example page time to pay homage before you read further. https://github.com/d3/d3/wiki/Gallery

This blog is not about how you can have your first D3 +
OBIEE chart. Rather, I would like you to google D3 + OBIEE. Read very
informative blogs by Rittman Mead, Red Pill Analytics etc.
Here in this blog I will share the code that I used in OBIEE
narrative view to achieve what you see in the screen shot.
This is a combination of the following 2 D3 codes.
Prerequisite
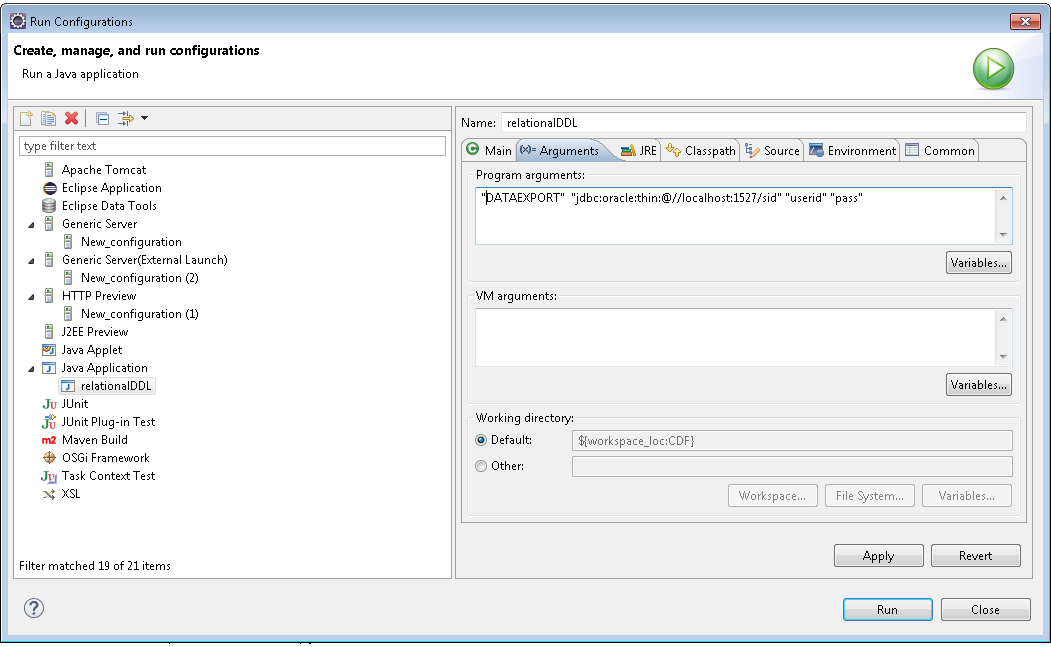
1. Set
your analyticsRes folder for your D3 library. If you don’t know how to set up a
custom folder in OBIEE, google “Deploy a custom folder in OBIEE”.
2. Download libraries and keep them in analyticsRes folder.
d3.v3.min.js
d3.tip.v0.6.3.js
3. Once
you set that up properly, you should be able to call D3 libraries like below
from your browser.
http://YourObieeServer:9502/analyticsRes/libraries/d3.v3.min.js
Prefix
<!DOCTYPE html>
<meta charset="utf-8">
<style>
.axis text {
font: 10px sans-serif;
}
.axis path,
.axis line {
fill: none;
stroke: #000;
shape-rendering: crispEdges;
}
.bar {
fill: orange;
fill-opacity: .6;
}
.bar:hover {
fill: orangered ;
}
.x.axis path {
display: none;
}
.d3-tip {
line-height: 1;
font-weight: bold;
padding: 12px;
background: rgba(0, 0, 0, 0.8);
color: #fff;
border-radius: 2px;
}
/* Creates a small triangle extender for the tooltip */
.d3-tip:after {
box-sizing: border-box;
display: inline;
font-size: 10px;
width: 100%;
line-height: 1;
color: rgba(0, 0, 0, 0.8);
content: "\25BC";
position: absolute;
text-align: center;
}
/* Style northward tooltips differently */
.d3-tip.n:after {
margin: -1px 0 0 0;
top: 100%;
left: 0;
}
</style>
<svg width="960" height="1060"></svg>
<script src="/analyticsRes/libraries/d3.v3.min.js"></script>
<script src="/analyticsRes/libraries/d3.tip.v0.6.3.js"></script>
<script>
var data=[];
Narrative
data.push({letter:"@1",frequency:"@2"});
Postfix
var margin = {top: 20, right: 20, bottom: 90, left: 40},
width = 640 ;
height = 290 ;
var formatPercent = d3.format(".2s");
var x = d3.scale.ordinal()
.rangeRoundBands([0, width], .1, 1);
var y = d3.scale.linear()
.range([height,
0]);
var xAxis = d3.svg.axis()
.scale(x)
.orient("bottom");
var yAxis = d3.svg.axis()
.scale(y)
.orient("left")
.tickFormat(formatPercent);
var svg = d3.select("svg")
.attr("width", width + margin.left + margin.right)
.attr("height", height + margin.top + margin.bottom)
.append("g")
.attr("transform", "translate(" + margin.left +
"," + margin.top + ")");
var tip = d3.tip()
.attr('class',
'd3-tip')
.offset([-10, 0])
.html(function(d) {
return
"<strong>Vendor: " +d.letter+"</strong> <span>
<p> Expense:$" +d.frequency
+"</p></span>";
});
svg.call(tip);
data.forEach(function(d) {
d.frequency =
+d.frequency;
});
x.domain(data.map(function(d) { return d.letter; }));
y.domain([0, d3.max(data,
function(d) { return d.frequency; })]);
svg.append("g")
.attr("class", "x axis")
.attr("transform", "translate(0," + height +
")")
.call(xAxis).selectAll("text").style("text-anchor",
"end")
.style("font-style","italic")
.attr("dx", ".5em")
.attr("dy", ".1em")
.attr("transform", function(d) {
return "rotate(-25)"
});
svg.append("g")
.attr("class", "y axis")
.call(yAxis)
.append("text")
.attr("transform", "rotate(-90)")
.attr("y", 8)
.attr("dy", ".8em")
.style("text-anchor", "middle")
.text("Expense");
svg.selectAll(".bar")
.data(data)
.enter().append("rect")
.attr("class", "bar")
.attr("x", function(d) { return x(d.letter); })
.attr("width", x.rangeBand())
.attr("y", function(d) { return y(d.frequency); })
.attr("height", function(d) { return height - y(d.frequency);
})
.on('mouseover',
tip.show)
.on('mouseout',
tip.hide);
d3.select("#obiee").append("input").attr("checked",
true)
.attr("type", "checkbox").on("change",
change);
var sortTimeout =
setTimeout(function() {
d3.select("#obiee").attr("type",
"checkbox").each(change);
}, 2000);
function change() {
clearTimeout(sortTimeout);
// Copy-on-write
since tweens are evaluated after a delay.
var x0 =
x.domain(data.sort(this.checked
? function(a,
b) { return b.frequency - a.frequency; }
: function(a,
b) { return d3.ascending(a.letter, b.letter); })
.map(function(d) { return d.letter; }))
.copy();
svg.selectAll(".bar")
.sort(function(a, b) { return x0(a.letter) - x0(b.letter); });
var transition =
svg.transition().duration(750),
delay =
function(d, i) { return i * 50; };
transition.selectAll(".bar")
.delay(delay)
.attr("x", function(d) { return x0(d.letter); });
transition.select(".x.axis")
.call(xAxis).selectAll("text").style("text-anchor",
"end")
.attr("dx", ".5em")
.attr("dy", ".1em")
.attr("transform", function(d) {
return "rotate(-25)"
}).delay(delay);
}
;
</script>
<div id="obiee">
</div>